In this 11 part tutorial, Sushan goes through the process of positioning the different layers of hair cards in Maya and how blending the different groups can create seamless and realistic looking hair. Artists will need to have hair textures created for this tutorial. 90+ mins of video content.
Introduction to Hair Cards in Maya - 4 mins
In the introduction, you can see the setup of the hair cards and how the different layers are generally laid out.
Creating The First Hair Card - 5.34 mins
Getting your first card is a straightforward process of creating a simple plane and then aligning the UV’s to your hair texture.
Positioning The First Row of Hair Cards - 14.28 mins
In this video, Sushan goes through the steps taken to create the first layer row of hair cards. Key things in this are to adjust the position and angle of verts to create curves to the plane to add volume. The key is to also use different hair textures to reduce the repetition.
Creating Transitional Hair Cards For The First Row - 16.57 mins
In this video, Sushan explains how to use hair cards to provide transitional hairs between the hair cards that have been created so far. This is where you will start to use the finer hair cards to add some loose overlapping hair to create some randomisation to the hair by moving, scaling, and rotating the verts of the hair card.
Refining Your Hair Cards - 7.03 mins
In this video, Sushan wasn’t too happy with the results he had, so he refers to his previous work for guidance. This involved moving the verts into different positions and also adding additional edge loops to his hair cards to provide some extra flexibility with the hair flow. It’s important to take your time and use references material to understand how you would like your hair to look.
Mirroring The Hair Cards - 12.06 mins
In this video, Sushan looks at mirroring the left side hair cards so that the hair goes across the whole head. After using symmetry, you will need to adjust the mirrored side so that this doesn’t look identical to the left side. This is a manual process but it involves adjusting the verts into different positions and taking advantage of the soft selection tool. One thing to make sure is to flip UV’s to ensure they are facing in the right direction.
Understanding the 2nd Row of Hair Cards - 13.15 mins
In this part, the process for creating the next layer of hair cards in the same way as the first row. In his example, there is more surface area on the head to cover, but this might differ depending on your character design.
Understanding the 3rd & 4th Row of Hair Cards - 6.28 mins
In this part, the process for creating the next layer of hair cards in the same way as the first row. In his example, there is more surface area on the head to cover, but this might differ depending on your character design.
Understanding the 5th & 6th Row of Hair Cards - 6.45 mins
Like the previous videos, Sushan just explains how he has laid the hair cards out.
Working on the Side Burns - 4.34 mins
Next is adding the side burns. This follows 3 layers of hair cards: a Base set, the Depth set, and the Short set. For the base, the geometry of the hair cards stay the same and may require some additional edge loops. The Depth and Short sets have geometry removed as these hair cards do not need as much hair.
Creating Flyaway Hair Cards - 7.53 mins
In this final step, Sushan takes a look at adding the flyaway hair cards. In some cases, it helps to create a hair strand and duplicate it and adjust it slightly so this will give the 2D hair strand a more visible 3D look. Another great tip was to add thickness to the single strands to scale the UV’s of the hair cards.
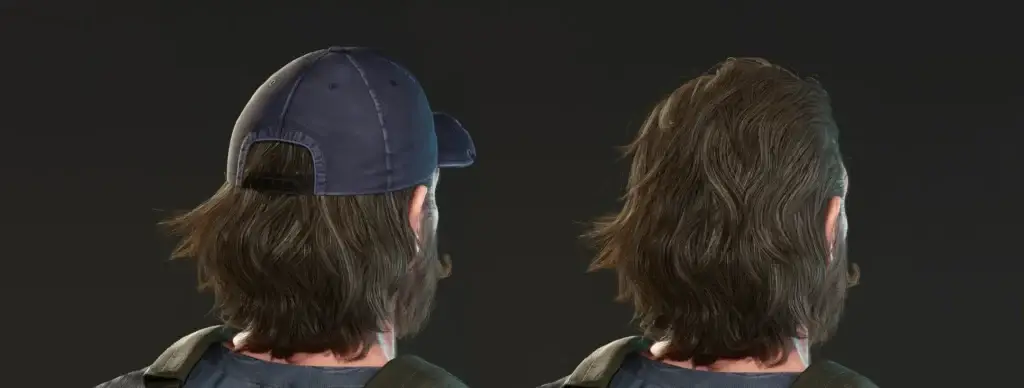
Below is the final asset once rendered in Marmoset Toolbag. You can view more renders of this character in full on Sushan portolio